Let's make it
Instructions.
- 1
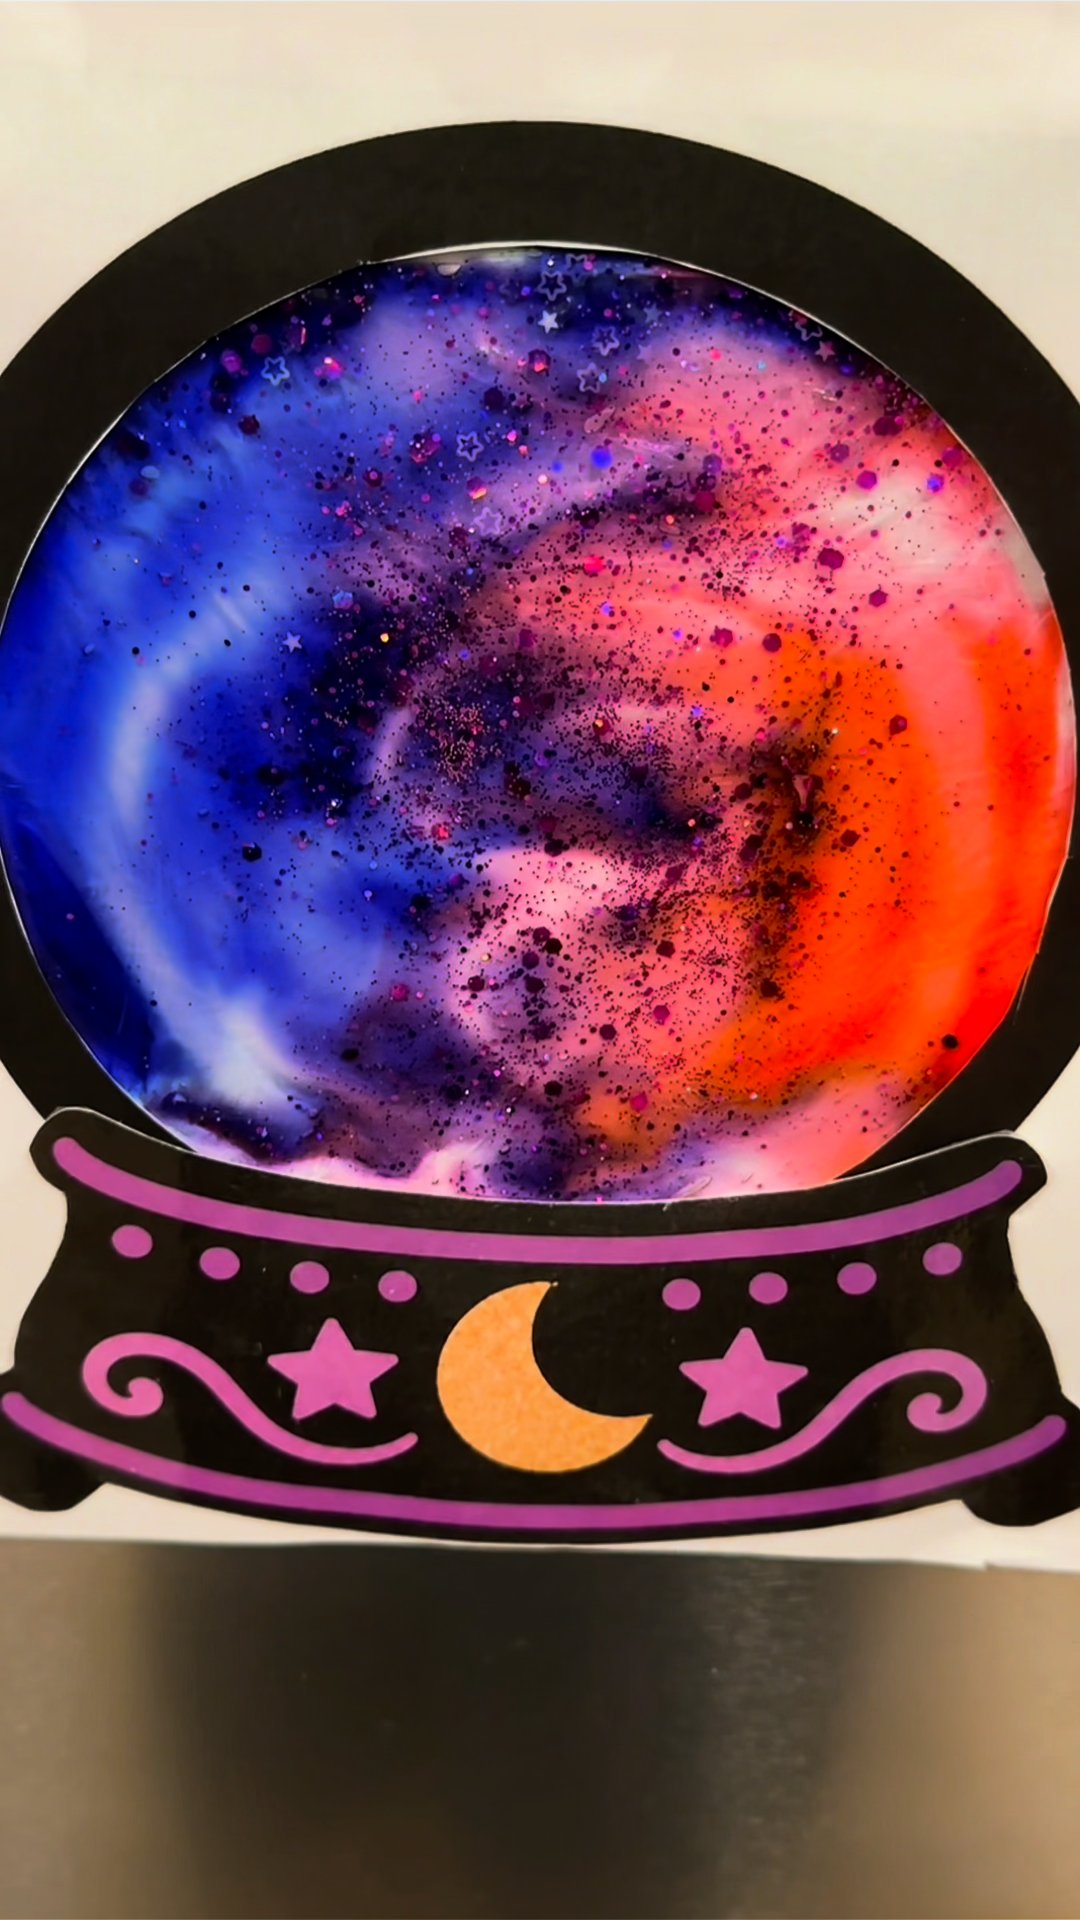
Print and color your crystal ball. Print your chosen templates at 100% (Actual Size). The color version's circular frame and decorative base are ready to cut. For the black-and-white version, have children color and decorate the frame and base before cutting with crayons, markers, or colored pencils. For a look similar to ours, color the frame black and decorate the base with purple, gold, and black.
- 2
Cut out the templates. Carefully cut around the outside of the circular frame and decorative base. To remove the center of the circle, gently fold the paper just enough to make a small starter cut in the middle, unfold it, insert your scissors into the opening, and cut along the inner circle. Children can help with cutting based on their age and abilities; adults may need to assist with the center opening and any tricky sections.
- 3
Make the sensory bag. Add approximately 2–3 tablespoons of clear hair gel to a sandwich bag, then a few drops of food coloring (we used purple and pink) and a sprinkle of regular glitter. Gently press the outside of the bag to swirl the colors and glitter together. Start with a small amount of gel: you want enough for the glitter to move around without making the bag too full.
- 4
Seal the bag. Gently remove most of the excess air and securely close the sandwich bag. Reinforce the zipper closure with strong tape. Before attaching the bag to your craft, gently press it over a protected surface to check for leaks.
- 5
Attach the sensory bag. Turn the circular paper frame over so the back is facing up. Position the filled bag behind the center opening so the colorful gel is visible through the circle, then use strong tape to secure the edges of the bag to the back of the paper. Avoid taping across the center so children can gently press and move the glitter around.
- 6
Add the decorative base. Position the decorative crystal ball base along the bottom of the circular frame and glue it in place, covering any small gaps or exposed edges. This gives your craft its finished crystal ball appearance.
- 7
Reinforce with cardstock (optional but recommended). For extra support, glue the paper portions of the crystal ball onto a piece of cardstock or heavier paper. Allow the glue to dry completely before playing.
- 8
Let the magic begin! Once everything is secure, children can gently press, squish, and move the glitter around inside their crystal ball. Encourage them to try using one finger at a time, watch the glitter move, or experiment with different amounts of gentle pressure.
Safety tip
- Hair gel is not edible, even when mixed with food coloring. This is not a taste-safe activity.
- Adult supervision is required throughout assembly and play.
- Plastic bags pose a suffocation risk. Keep loose and unused plastic bags away from babies and young children.
- This activity is intended for children who can participate without putting the bag in their mouths, biting it, or trying to open it.
- Use only a small amount of hair gel and do not overfill the bag.
- Secure the zipper closure with strong tape.
- Check the bag for leaks or damage before and throughout play.
- Discard the sensory bag immediately if it tears, opens, or begins leaking.
- Glitter may pose a choking hazard if the bag opens and the contents become accessible.
- Food coloring may stain clothing, skin, and work surfaces.
- Keep hair gel away from eyes and mouths. Follow the safety instructions on the hair gel packaging.
- Encourage gentle pressing rather than hard squeezing.
- Age guidance: We suggest this activity for children ages 3 and older who are able to follow safety directions and are not likely to mouth the materials. Close adult supervision is essential regardless of age. The activity may not be appropriate for some children even if they are older than 3.
- Sandwich bags are not designed as sensory toys or guaranteed to be leakproof. This craft is intended for short, supervised sensory play rather than independent or unattended use.
- Use child-safe scissors for children, and supervise all cutting. An adult should handle the center opening and any tricky cuts.
Learning Through Play
This craft offers several opportunities for children to develop skills while having fun.
Fine Motor Skills: Coloring, cutting, and gluing encourage hand control, coordination, and use of the small muscles in the hands. Cutting also provides opportunities to practice hand strength and endurance.
Bilateral Coordination: Holding the paper with one hand while cutting or gluing with the other encourages both hands to work together.
Following Directions: Depending on their age and abilities, children can practice following step-by-step instructions, completing tasks in order, and working toward a finished project.
Sensory Exploration: Pressing the finished sensory bag allows children to explore movement and texture without touching the gel directly.
Visual Tracking and Finger Control: Watching and moving the glitter encourages visual attention, finger isolation, and controlled movements.
You can adjust how much assistance you provide based on your child's abilities and interests.
Field Notes
- Color before cutting. If you're using the black-and-white printable, let kids decorate it while the sheet is still intact.
- Less gel is more. Start with 2–3 tablespoons and leave room for the gel to move so the seams aren't under pressure.
- Regular glitter works! You don't need specialty moon or star glitter for a magical effect.
- Make a starter cut. Gently fold the center of the paper to start the circle, then unfold and finish cutting.
- Tape, gaps, and support. Strong tape held our bag securely. A small gap at the bottom of the circle got covered by the decorative base, and gluing everything to cardstock made it sturdier.